No-Evacuation Mold Remediation Guide for Professionals
Manufacturer-direct formulations used by mold remediation contractors, inspectors, and facilities teams to remediate mold in occupied environments — without unnecessary downtime.
For commercial and professional use only. Not a consumer DIY product.
Who This Is For
- Mold remediation contractors
- Inspection & clearance companies
- Facilities & property managers
- Multi-unit and occupied buildings
What This Solves
- Mold remediation without occupant evacuation
- Reduced operational downtime
- Treatments compatible with clearance requirements
Designed for professional remediation workflows
Why Evacuation Is Common in Mold Remediation
Evacuation is often a function of method, not mold severity.
- Airborne agitation increases exposure risk
- High-volatility chemicals affect indoor air quality
- Aggressive removal elevates particulate levels
- Liability and clearance concerns default to evacuation
When No-Evacuation Is Possible in Mold Remediation
- Surface-focused treatment instead of airborne fogging
- Low-volatility formulations
- Controlled application methods
- Professional containment and negative air control
- Inspection-aligned workflows
The Mold Remediation Process
The Professional Mold Remediation Workflow
In professional mold remediation, treatment decisions are guided by inspection data, not assumptions. A typical remediation workflow begins with environmental assessment, followed by targeted remediation and post-treatment verification.
STEP 1: Inspection, Sampling, and Reporting
These protocols are site-specific, based on building conditions and inspection findings.
A qualified mold inspector or industrial hygienist performs:
- Air sampling
- Surface sampling
- Moisture assessment
Samples are analyzed by a laboratory, and results are documented in a report outlining:
- Mold types present
- Concentration levels
- Affected areas
- Recommended remediation protocols
Step 2: Containment and Area Preparation
This containment protects unaffected areas of the structure during remediation.
Prior to remediation:
- Affected areas are isolated using plastic or nylon containment
- Seams are sealed with tape
- HVAC vents servicing the area are sealed or isolated
- Negative air machines are installed to control airborne particulates
Step 3: Active Remediation
This process removes and/or remediates materials specified from inspection protocols.
During remediation:
- Water-damaged drywall and materials are removed, typically extending beyond visible moisture damage
- Wall cavities, exposed framing, and structural components are accessed
- HVAC components are evaluated and cleaned where contamination is identified
Surface treatment may be applied to:
- Clean visible mold staining
- Treat exposed substrates
- Address contamination within wall cavities, framing, and HVAC surfaces
Step 4: Post-Remediation Protection
These steps are designed to support long-term surface control after remediation.
Following active remediation:
- Treated surfaces may be stabilized or encapsulated, depending on protocol requirements
- Exposed framing, furring strips, and wall cavities are addressed to reduce future growth risk
- Unsalvageable contents are removed; salvageable items are treated as appropriate
Step 5: Air Filtration and Clearance Preparation
Treatments used in professional workflows are compatible with extended negative air operation.
Negative air systems remain in operation during and after remediation to:
- Filter airborne particulates
- Support air quality stabilization
- Prepare the space for post-remediation verification
Step 6: Post-Remediation Verification
Successful remediation is confirmed through inspection and verification, not visual appearance alone.
Once remediation is complete:
- Inspectors return to collect follow-up air and surface samples
- Results are compared to pre-remediation data
- Clearance is documented based on protocol requirements
Products used in occupied-environment remediation workflows can be found in our No-Evacuation Mold Remediation Chemicals.
Validation and Field Use
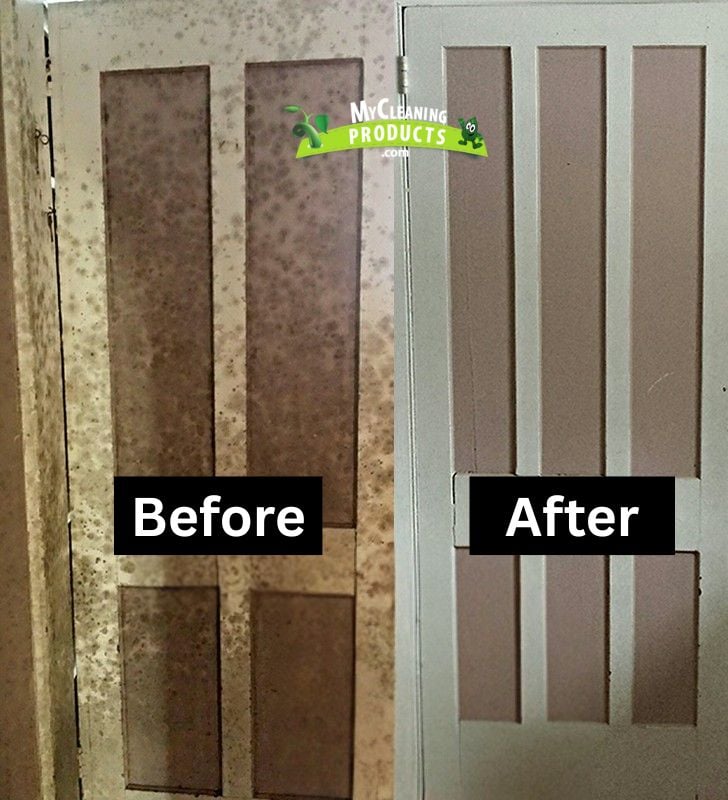
"Never Failed Any Mold Test"
”Every time I used Molderizer to remove the mold form the properties and after cleaning the entire place we applied the sealer “safe shield” we never failed in any test. All the mold test have been very successful with your product Molderizer 1 gallon and safe shield 1 gallon.”
Next Steps
No-Evacuation Mold Remediation Chemicals
Manufacturer-direct mold remediation formulations used within the professional workflow outlined above. Designed for occupied environments, inspection-aligned remediation, and repeat commercial use.
